Home
Woodworking
Hand Railings
Skirt Boards
Crown Molding
Bidding
Wainscoting
Chair Rail
Interior Doors
Closet Doors
Exterior Doors
Installing Doors
Baseboard
Installing Baseboard
Windows
Install Cabinets
Hand Tools
Power Tools
Blog
Contact
Link Partners
Tool Reviews
About Me
Can't Find Something?
Check The Sitemap
Site Map
Woodworking
Hand Railings
Skirt Boards
Crown Molding
Bidding
Wainscoting
Chair Rail
Interior Doors
Closet Doors
Exterior Doors
Installing Doors
Baseboard
Installing Baseboard
Windows
Install Cabinets
Hand Tools
Power Tools
Blog
Contact
Link Partners
Tool Reviews
About Me
Check The Sitemap
Site Map
[?] Subscribe To This Site


Installing Cabinetry
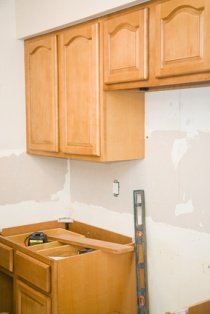
Chapter 2 Installing Cabinetry: Getting Your Upper Cabinets Installed
We are now ready to get your uppers hung for Installing cabinetry. Since there are so many different styles and configurations that a kitchen can be designed in I have decided to make this part of installing cabinetry relatively simple and just explain how to install a straight run of cabinets. This way you will get the basics and be able to install a wide variety of cabinets. By explaining a basic run of cabinets you will get a good foundation and it will help you with the other more complicated cabinets. For a reference point this "kitchen" is going to be 6 feet, or 72" and consist of two 12" upper cabinets and two 24" upper cabinets and when you are looking at the kitchen there is a side wall on your right and the run ends opens. This means there is no side wall on the left. Do you have it visualized? Let's get hanging and installing cabinetry...
Installing Cabinetry
The first thing that you need to do is draw a level line. This is so you know you are staying level as you move down the run. This line needs to be 54" off of the flooring. This means that if your flooring is not installed that you need to add on the thickness of the flooring.
So take your tape measure and every couple of feet make a mark on the wall 54" high.
Then take your level and start from the corner, get it on you marks checking to make sure you a level and then draw a line, continue this all the way down the wall to the end of your cabinet run.
When you need to move the level to continue your line, make sure that you overlap the level from the old line to the new line at least a 6 or so inches. This will make sure that your line you drew did not start to run out of level.
Now there are two ways to go. One, you have help or two, you don't. If you don't have help then I am going to suggest that you install a "hang rail" on to the wall. This will help you to stabilize the cabinet as you are doing the installation.
What you do is you take a 1" X 2" piece of wood and screw it to the wall on your level line. The strip should be under the line with the top of the strip being right on the line. If you have help you need to have them hold the cabinet against the wall, this makes it much easier to hold the cabinet into place and keeps it from slipping.
Locating Studs For Installing Cabinetry
Next, you are going to need to locate your studs. In most new homes the studs are 16" apart but that is not always the case so you need to check it to be absolutely sure. Since you have side wall you will need to locate at the first two studs on it also. You need to begin where you are beginning the installation so you need to start from the corner (the right in this example).
Run your stud finder along the wall until you find the first stud. When you find it, measure from the corner to the center of the stud, I write that measurement on the wall so I can refer to it later.
Continue this along the entire run always measuring from the corner to the center of the stud.
You are going to begin this kitchen in the corner, and so it looks like a professional did it you will start with a 12" cabinet in the corner. You will need to check both 12" cabinets and make sure that you have the right one, as some of the manufacturers pre-hinge the doors to open the correct way. In this instance you are looking for the door that opens to the right this means that the hinges will be on the right side of the cabinet. (Note: some manufactures, if the door is a "square" meaning there is no arch or cathedral arch design on the door they make the door reversible and you may need to flip it over).
Now you need to make a mark on the inside of your cabinets so that you can drill to the measurements of the stud distances. It is very important that you measure from the front of the cabinet otherwise your measurements are going to be off because of the styles on the side of the cabinet. Since most studs are 16" a part you can already tell that you are only going to be able to hit one stud on this 12" cabinet so it will be important that you hit the stud in the center on the top of the cabinet and towards the bottom of the cabinet.
When you make your marks you need to make sure that you hit the hang rails on the back of the cabinet. This is necessary to securely fasten the cabinet to the wall. I personally like to come at least 1 ½"" to 2 " from the side of the cabinet before starting the screws.
On this first cabinet you are also going to want to mark where the side wall's stud is. Once you have your marks made you then want to get your screws started.
Getting your screws started while the cabinet is still on the ground will help you greatly as it will save you time and help you greatly as you won't be fumbling around trying to hold a cabinet and start a screw. These screws should be your 2 ½" wood screws with the beauty washers on them. The beauty washer is used by professionals so the screws don't sink too far into the backs of the cabinets causing the wood to split and it just gives you a cleaner looking job.
Pre-drilling For Installing Cabinetry
Once you have the back and the side predrilled for the securing the cabinet to the wall you then need to drill pilot holes for the screws that you are going to use to connect the cabinets with. For this cabinet it is going to be on the left side of the cabinet. Pilot holes should always be used because you are going to run a screw through solid wood and wood species like oak are considered hard wood. If you are not careful with hard woods you will get the screw in a bind and you will split your styles. So don't get in a rush and try to skip that step. As with the screws going into the wall I like to come off the top and the bottom of the cabinet at least 2 ½" as it gives you more room to maneuver.
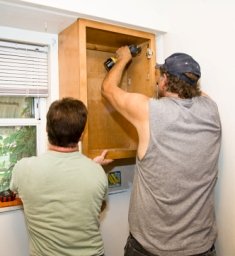
You are now ready to hang the cabinet (Tip For Installing Cabinetry: to make things much easier on yourself lay your screw gun down inside the cabinet first).
Lift the cabinet into place, if you are using the hang rail set the cabinet on the rail and hold the cabinet against the wall by placing your left hand on the left style with your right hand bring over the step ladder.
Get on the step ladder and continue to push the cabinet to the wall with your left hand.
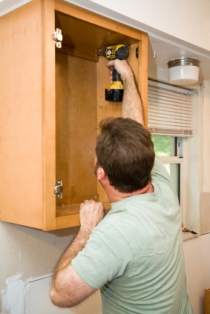
Get your screw gun into your right hand and begin to screw the cabinet into place. With this cabinet I would begin with the back, top right screw, then go to the side screw and then get the bottom screw.
Installing Cabinetry Securely
When you are running these screws you need to make sure that you hit the studs. You should actually be able to feel the screw tighten when you hit the stud and often times the screw will make a loud screeching type sound when you hit it. To check this, double check your measurements from underneath the cabinet to the center of the stud and "eye ball" your screws. You should be able to clearly see that the screws are along the same line as your measurement.
Once you are satisfied that the cabinet is secure you can get ready to hang the next cabinet and in this sample it is going to be either one of your 24" cabinets. For this example we are assuming that these cabinets have two doors. If you have a 24" cabinet that has one door make sure you check the hinging. The first thing you need to do with this cabinet is to drill a pilot hole on the outside right style so that they match up with the ones you drilled on the inside left of the 12" cabinet. This will allow you to connect the cabinets together.
Then mark and pre-drill the back of the cabinets for the screws that are going to the studs. Remember to make sure you are going through the hang rails. With this size cabinet I like to make sure that I hit two studs if at all possible and put two screws in the top of the cabinet and at least one on the bottom. Some people prefer two on the bottom it won't hurt to put two in so if you feel safer having two by all means go ahead and do two.
You will also want to pre-drill the holes for the next cabinet that you will connect with. You will do this on the inside of the left style.
Next you are going to lift this cabinet into place. It needs to be a close to the cabinet on the right as possible. While holding the cabinet into place you then want to use screws (that you have previously figured out in the supply chapter the correct length to use) to connect the cabinet.
You will come from the inside of the 12" cabinet and screw the two together. It is much easier to start with these screws and it will pull the cabinets tightly together.
Then screw the cabinet to the wall. Make sure that you take the time to "throw" a level on the bottom of the cabinet to make sure that you are staying true to the level line.
What you want to do next is to prepare the next 24" cabinet just as the previous cabinet was prepared, pre-drilling and getting your pilot holes drilled correctly.
Then you finish off the run with the 12" cabinet with the hinging on the left and this cabinet should also have the left end finished (that means stained).
Congratulations, you have just hung your first run of cabinets. Now I know that these sizes are not the same sizes you have but each cabinet works basically the same and you should be able to use these instructions to help you get going installing cabinetry with your kitchen. Now you are ready to install the bases!
Return From Installing Cabinetry page to Home - Finishcarpentryhelp.com.