Home
Woodworking
Hand Railings
Skirt Boards
Crown Molding
Bidding
Wainscoting
Chair Rail
Interior Doors
Closet Doors
Exterior Doors
Installing Doors
Baseboard
Installing Baseboard
Windows
Install Cabinets
Hand Tools
Power Tools
Blog
Contact
Link Partners
Tool Reviews
About Me
Can't Find Something?
Check The Sitemap
Site Map
Woodworking
Hand Railings
Skirt Boards
Crown Molding
Bidding
Wainscoting
Chair Rail
Interior Doors
Closet Doors
Exterior Doors
Installing Doors
Baseboard
Installing Baseboard
Windows
Install Cabinets
Hand Tools
Power Tools
Blog
Contact
Link Partners
Tool Reviews
About Me
Check The Sitemap
Site Map
[?] Subscribe To This Site


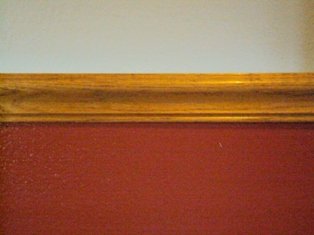
Chair Rail
Installing Chair Rail

|

|

|
Whether you want to use it as protection or maybe just looks another good idea is to consider what obstacles are in the way as you run your rail and how you will be making transitions like starting and stopping or ending it and where it will come out at counter tops etc.
Instructions
To begin after you have considered all the options as described above you will want your chair molding level.
Snap a level line around the room and use this line to mark the bottom of the rail.
Next is finding and marking the stud locations. This is easily done with a stud finder and is important so the rail is mounted to the wall solidly.
When you come to a corner decide how you want to proceed through the corner whether you plan on coping the rail or cutting the degrees to the rail to meet up with the next piece. Example is at a 90 degree corner you would cut a 45 degree to each piece. Coping is my preference and almost 90% of the time this is what I do at corners as in my opinion it is neater and gives a more professional look.
If you don't know how to cope go to my coping baseboard page and apply this method to your chair molding. Once you learn the coping method I think you will agree with my opinion. In my opinion and experience start with your longest wall and try to end up so you are not coping both ends on the same piece when you are finished as this is difficult and time consuming for inexperienced trimmers and why risk wasting expensive material.
If you are ending in a place where the rail does not run into a wall or other trim such as door trim or an opening that doesn't have trim around it you will want to do a miter return. Again a miter return is not hard to do and is the same as a miter return applied to baseboard. Go to my baseboard return page to learn this neat little trick. This will give you a very clean, neat and professional ending.
Most of the methods described in the baseboard pages can be applied to all sorts of trim work. Reading the instructions carefully and practicing will give you the results you desire.
Chair molding Ideas
Chair Rail Ideas and Information.
Decorative Chair Molding
More Chair Rail Information.
Chair Molding Height
Find out The Correct Height For Your Chair Rail
Return From Chair Rail Page to Home - Finishcarpentryhelp.com