Home
Woodworking
Hand Railings
Skirt Boards
Crown Molding
Bidding
Wainscoting
Chair Rail
Interior Doors
Closet Doors
Exterior Doors
Installing Doors
Baseboard
Installing Baseboard
Windows
Install Cabinets
Hand Tools
Power Tools
Blog
Contact
Link Partners
Tool Reviews
About Me
Can't Find Something?
Check The Sitemap
Site Map
Woodworking
Hand Railings
Skirt Boards
Crown Molding
Bidding
Wainscoting
Chair Rail
Interior Doors
Closet Doors
Exterior Doors
Installing Doors
Baseboard
Installing Baseboard
Windows
Install Cabinets
Hand Tools
Power Tools
Blog
Contact
Link Partners
Tool Reviews
About Me
Check The Sitemap
Site Map
[?] Subscribe To This Site


Trimming Windows
Explanations and options for Window Trim
My explanations for trimming windows can be applied to some situations but not all as to the many different styles of windows and window trim. There are many different applications as well as shapes and sizes of windows.For the purpose of this page we will be assuming the windows are already installed and ready for window trim.
That being said basically after the windows are installed they either come with jambs installed directly to the windows or they don't and will have to be installed by the trimmer.
The dictionary definition of a jamb: "either of the vertical sides of a doorway, arch, window, or other opening," "forming the sidepieces for the frame of an opening" In other words the jamb on a window is the part that covers the rough opening around the window to the inside finished wall.

Sometimes depending on the manufacturer the window trim will come with the window other times you will have to buy the jamb and casing separately.
If the jambs are already factory applied to the window as a unit then all you have to do is apply casing again depending on the style. If you have some sort of round or partially round windows the manufacturer will send the window trim with the window. If your windows came without the jambs you have a couple different choices on how to jamb and case them. One good and easy way to go is to measure the windows and call your local lumber yard or store give them the measurements and order the window insert jambs all premade.
They can also be pretimmed or precased so all you have to do is slide them in center them and nail them. It is very easy quick and they look very nice.
To Many Different Styles Of Windows For One Explanation
Another way is to buy the jambs and put them together yourself slide them in and then case them. This way also may be cheaper but your time does mean something so weigh your time against the cost.
Another route for trimming windows is to buy the stock and make all the jambs yourself. This involves a lot more work and really is not as easy as you would think so again think about your time and add a little in for frustration. I don't recommend this because of the ease at the alternative methods.
As you can probably tell there are many ways to go about trimming windows depending on what you get or have.
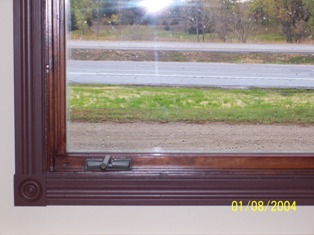
Let's assume you are trimming a window that has the jamb factory installed and is part of the window and the window is installed and ready to be cased. Casing this window with casing all the way around may include having 45 degree miters at each corner.
If this is the situation it may be easier for an inexperienced person doing this for the first time to cut the casing and nail it all together securely before applying it to the window. In other words build a picture frame out of the casing and then centering it at the window and nailing it on.
There are some variables to consider when trimming windows this way and one big problem is the sheetrock has to be nice and flush with the outer edge of the jamb all the way around the window. If everything is nice and flush then you are good to proceed with this particular method.
If the jamb of the window protrudes out past the sheetrock this method of installation for casing a window will not work well. The reason for this is because as you nail the outside of the casing to the sheetrock wall you are bending the casing back to the wall and that results in spreading the miters apart.
Each miter will have a different degree and not be perfect 45 degree miters at the corners. In this particular situation of trimming windows it would be best to put each piece of casing up individually and working each miter individually as you work your way around the window.
Trimming Windows With Target Blocks
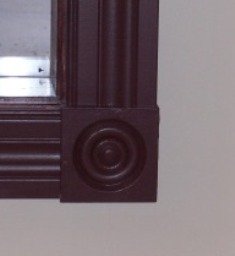
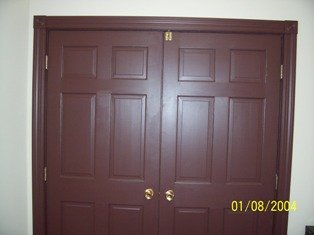
Another easier way of trimming a window is to install target blocks at the corners. This way there is no miters at the corners and the casing butts right up to the target blocks. These blocks come in different sizes for the different sizes of casing. This is a look similar to the Victorian age but is still very popular. Here are some pictures of the use of target blocks with bigger Victorian type casing. Smaller target blocks can be bought for the smaller type trim such as colonial or ranch casing. These pictures are of old windows with new casing and target blocks installed also a picture with the use of target blocks and new trim applied to an old set of doors which were painted.
45 degree angles in Finish Carpentry
Casing with 45 Degree Angles
Finish Carpentry Tips, Tricks, Difficulties and Techniques
Finish Carpentry Tips, Tricks, difficulties and Techniques.
Return From Trimming Windows to Home - Finishcarpentryhelp.com.