Home
Woodworking
Hand Railings
Skirt Boards
Crown Molding
Bidding
Wainscoting
Chair Rail
Interior Doors
Closet Doors
Exterior Doors
Installing Doors
Baseboard
Installing Baseboard
Windows
Install Cabinets
Hand Tools
Power Tools
Blog
Contact
Link Partners
Tool Reviews
About Me
Can't Find Something?
Check The Sitemap
Site Map
Woodworking
Hand Railings
Skirt Boards
Crown Molding
Bidding
Wainscoting
Chair Rail
Interior Doors
Closet Doors
Exterior Doors
Installing Doors
Baseboard
Installing Baseboard
Windows
Install Cabinets
Hand Tools
Power Tools
Blog
Contact
Link Partners
Tool Reviews
About Me
Check The Sitemap
Site Map
[?] Subscribe To This Site


Baseboard Installation
Complete Instructions for Installing Baseboard Trim
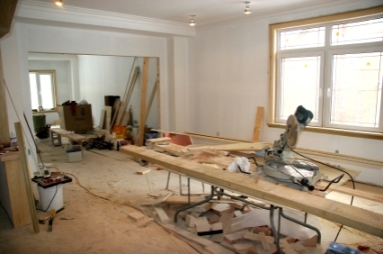
Baseboard installation goes quick and is relatively easy. There are different sizes and styles of baseboard trim. Here I will be referring to a couple different styles which would include colonial, Princeton and or Ranch baseboard trim all of which are the most common and easy to find in most parts of the country.My method of baseboard installation with these types and other types of baseboard trim are proven from my extensive experience of finish carpentry.
Start with The Longest Wall
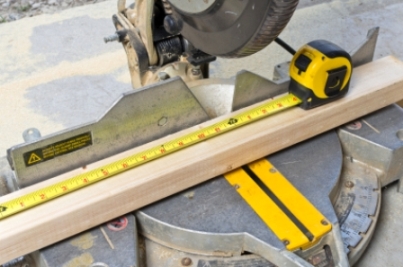
Lets start for example in a bedroom. The first place I start with will be the longest wall. Just for this sake we will do one piece at a time, when you get the hang of baseboard installation you will be taking multiple measurements before going to the miter saw.Take out your tape and measure from corner to corner being extra careful to get an exact measurement from sheetrock to sheetrock corners.
Pick out a nice piece of baseboard trim for this measurement and at the same time pick out a couple more that have a close wood grain pattern and color. The wood grains and color can vary quite a bit even though it is the same wood. For quality baseboard installation you want to try and match this as best as possible for a good look to your woodwork.
If you have an undesirable piece of base in your pile, grab that also and head for the miter saw.
Set Up And Cutting With The Miter Saw
At the miter saw set your undesirable piece or just any piece of baseboard trim on your miter saw with the finished part out towards you and the back against the fence.
Adjust your tables or rollers or what ever your wood is resting on so you can hold it firmly against the fence of the miter saw with total control. It is important to have a good firm grip on the wood while you are cutting it so as not to injure yourself. Cut 5 or 6 pieces about 3" to 4" long and put them in your tool belt for later.
Now grab the nice piece of new wood you picked out and set this on the miter saw.
Cut the very end off so you know you have a nice square cut end.
Transfer your measurement from the bedroom to this piece of baseboard and add about an 1/8" to your measurement.
Cut this piece and head for the room where you are installing baseboard.
Provide A Space For Carpet (New Construction or New Remodel)
Take out the short pieces of base that you had cut and lay one flat on the floor in your starting corner and another in the other corner at your ending corner.
Take the remainder of short base pieces and spread them out 3' to 4' apart against the wall flat on the floor so your new baseboard trim will be up on top of these and off the floor providing a space for the carpet to be tucked under.
Next find the center of at least one stud in the wall which your base will be nailed to and put a pencil mark on the floor marking the center of this stud.
Now assuming you measured and cut your piece of baseboard correctly it should be a shade long.
Put one corner in and bend the wood so you can get the other end in against the wall in the opposite corner. Your piece of baseboard trim will be slightly bowed out so all you do is slap the middle in and it will stay.
Make sure the new wood is resting nicely on the short pieces that you laid down, if not just lightly tap it down where ever necessary and you are ready to nail.
Finding And Shooting At The Stud Locations
Find the mark on the floor that gives you your stud location.
Start your tape on this mark and put a pencil mark every 16" in both directions to the corners. This is assuming the studs are 16" on center and that is usually standard. Sometimes the studs may be 2' on center and this does happen quite often in a lower level or basement of a house which is being finished.
Grab your big finish nail gun and shoot a nail in about a 1/2" down on the baseboard at your marked stud locations.
Check to see if you are hitting the studs by slipping your little 7" wonder bar underneath the baseboard and gently prying up and out. A stud finder is a nice tool to have at this point and relatively cheap for saving time while doing the baseboard installation.
A Few Extra Tips for Baseboard Installation
These instructions are obviously installing one piece of baseboard from an inside corner to another inside corner. If you need the instructions for an outside corner or in other words going from an inside corner to an outside corner then you would need to go to the instruction page at cutting baseboard at a 90 degree outside corner.
Each corner is handled a little different but the installation as described above is the same. Once you learn how to do all the different corners there are little tricks that you will pick-up along the way.
Follow all the instructions carefully; there are little tricks and techniques written in the directions to help you out along the way. Once you have the basics down don't be afraid to try different things, everyone learns their own techniques.
Links to the Other Baseboard Instruction Pages
If you are at an inside corner then you're ready for the next part which is coping baseboard for an inside 90 degree corner. To get the instructions click here: coping baseboard.
Also available are these links to instruction pages for cutting baseboard at 90 degree outside corners and an explanation page on what a baseboard return is along with how to make and install them.
If you don't understand any part of the instructions regarding baseboard installation send me an e-mail, I would be glad to clarify.
Instructions for Installing Baseboard Trim On Stairs
How To Install Baseboard On Stairs.
Return From Baseboard Installation to Home - Finishcarpentryhelp.com.