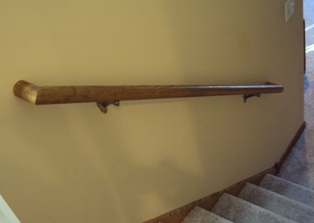
Simple instructions for mounting a wood handrail to a wall with mounting brackets.
In the event of a curved stair way you may want to seek other options or have a specially made handrail.
One important thing to consider is, that you need the handrail that is going to be mounted to the wall to reach past the top step at least 4" and same for the bottom step when possible.
That way people can grab on to it before negotiating the steps.
Once you have that
measurement then cut the rail at that length with a 45 degree cut on each end so each end
will have a miter and a short piece which goes into the wall.
In other words once the
handrail is mounted to the brackets the outside part is longer than the inside according to
the angle cuts.
No special cuts just two 45 degree cuts on each end.
Finding The Height Of The Wood Handrail
Next we need to figure out the height it will be mounted at.
There is an OSHA code for this
and the code in my area is a height of 34-38 inches up from the steps.
I would assume this
is a constant standard but is worth checking out in your area.
I put mine perfectly at 37
inches every time and here is how I do it.
On a 4'level hook your tape at one end and measure 37 inches and make a mark right on the
level.
At the stairs go one step down from the top and set your level on the outer edge of
the step with the level flat against the wall.
The outside edge of the level should be
directly in line and vertically level or plumb with the outer edge of the step.
When you
have the level plumb with the step make a small plus (+) sign on the wall from the 37" mark
off the level.
So you should have a pencil mark exactly 37" vertical up from the outside
edge of the step.
Repeat this every three feet or so all the way down the steps and using
the level for a straight edge connect the pencil marks for a nice straight line down the
steps at exactly 37" up from the steps.
Always use a pencil for this as pencil can be
painted over or washed off.
Finding The Stud Locations
Next you will need a stud finder to locate the stud locations.
Move the stud finder down this
line and mark the stud locations on this line being extra careful to be finding the center
of each stud.
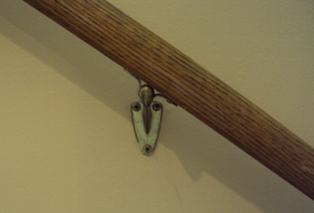
Now for mounting the handrail brackets.
To start you want brackets to be as close to the ends of the handrail as possible at the top
and bottom.
I like to mount the brackets no more than 4' apart preferable closer when
possible.
After you have figured out which stud locations will have a bracket we are ready
to mount them.
At the stud locations you chose for brackets you should have a pencil mark
intersecting the line going down the stairs.
At the point where these lines intersect
measure down 2 3/4" and make a mark.
Using a torpedo level draw a level straight line down to
this 2/34" pencil mark and beyond so you can use the bottom screw hole as a reference to
keep the bracket straight also to be sure you are staying in the middle of the stud.
Mounting The Brackets
Put the
top edge of the bracket at this 2 3/4" mark and using the screws provided screw the bracket
to the wall.
You may want to predrill these holes before running in the screws.
Repeat this
at every stud location where the brackets will go.
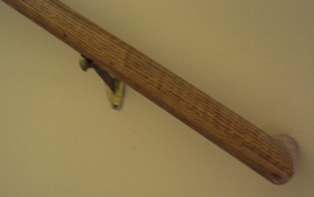
Now its just a matter of setting your wood handrail on these brackets in place and using the
extra bracket pieces which secure the wood handrail to these brackets to mark the holes for the screws.
These holes will need to be predrilled before screwing.
After you
have the wood handrail secured to the brackets it's just a matter of making the end pieces so you have
nice neat returns into the wall.
Making The Returns
The only thing left to do is to make these returns and to do this measure the outer point of
the end of the wood handrail to the wall.
Go back to the saw and cut a 45 degree angle to a new piece
of this rail and transfer the measurement to this piece from the wall.
Take this short piece
back to the stairs and trial fit it and adjust as needed to get these returns nice and neat.
When you have these made and ready to attach using some glue, glue the 45 degree cuts and
fit into place then using a small finish nailer nail it together at the miter from both directions.