Home
Woodworking
Hand Railings
Skirt Boards
Crown Molding
Bidding
Wainscoting
Chair Rail
Interior Doors
Closet Doors
Exterior Doors
Installing Doors
Baseboard
Installing Baseboard
Windows
Install Cabinets
Hand Tools
Power Tools
Blog
Contact
Link Partners
Tool Reviews
About Me
Can't Find Something?
Check The Sitemap
Site Map
Woodworking
Hand Railings
Skirt Boards
Crown Molding
Bidding
Wainscoting
Chair Rail
Interior Doors
Closet Doors
Exterior Doors
Installing Doors
Baseboard
Installing Baseboard
Windows
Install Cabinets
Hand Tools
Power Tools
Blog
Contact
Link Partners
Tool Reviews
About Me
Check The Sitemap
Site Map
[?] Subscribe To This Site


Waynes Coating, Wainscoting
Installing Wainscoting
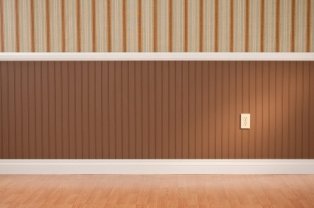
Installing waynesWainscoting is most commonly made of tongue and groove boards applied to the lower part of a wall at various heights and has some sort of chair rail or trim piece or molding which covers and decorates the top edge of the wood.
The key to putting it up successfully is starting out level and making sure it is applied to the wall tightly with adhesive and nails. Checking for level periodically will help keep everything plumb as you go.
Acclimate Your New Wainscoting for Best Results
To get the best results acclimating the wood is necessary. Acclimating the wood refers to letting the wood adjust to the humidity and temperature of the room. To do this just bring the wood into the rooms where it will be installed a day or so ahead of time before installing.
Starting Out For Installing Wainscoting
Decide on the height you want your waynes coating to be at and then snap a line on the wall at this height. Keep in mind some sort of chair rail or molding will be on top of this line.
To make things easier keep your waynes coating off or above the floor about a ¼ to ½ inch or so because of imperfections in the floor. Baseboard will cover this later.
Measure this distance now and cut all the boards to this length.
Next find the studs in the wall with a stud finder and mark the stud locations on the wall.
Then screw a nice straight board to the wall securely at this line making sure it is nice and level so the tops of the wainscoting can be butted to it while installing.
Installing The First Board
Start out by putting the first piece into a corner with the grooved end toward the wall and the tongue side out. Tack it temporarily in place if preferred. Check this first piece with a level and scribe the wall to this piece with a pencil.
Next using a jig saw cut along this line and trial fit into the corner being sure to check again with the level making everything perfectly plumb starting out.When this piece is perfectly plumb and level go ahead and pull it back out.
Sand the rough edge of the cut side and apply a generous amount of adhesive to the back and nail it permanently in place.
Installing The Second Board
This board will be nailed at the inside part of the tongue. The idea is that the holes from the nails will be covered up by the next adjoining piece.
Nail every 12 inches or so up the board and angle the nails in toward the board. Be sure to be appling adhesive to each board as very few nails will actually be hitting studs except at the bottom. Be sure to be hitting the bottom plate 2x4 with nails on every board. Nail into the studs at the stud locations when possible.
Working Your Way Down The Wall
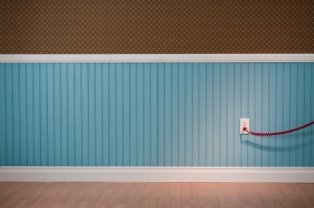
As you work your way down the wall installing wainscoting, be sure to be checking for level and be making any small corrections as needed to keep the wood plumb. Take your time at the outlet locations, carefully mark, measure and cut them out neatly.
A special note here is waynes coating
After the wood is all installed then the only thing left to do is remove the top board and decide on some stylish chair rail and install that over the wainscoting.
Other Wainscoting Pages and Information
Are you on a modest budget? Check out this link for some good points and ideas on a budget. These ideas may get you thinking about a unique style that is all your own. Ideas And Unique Styles
Or maybe this page Cheap Wainscoting
Check out this link for more features that raised panel version can provide. Also ideas for other areas it could possible go in your home. Raised Panel Features
Want to revitalize a dull bathroom? Check out this link for ideas to really make a stylish bathroom with bathroom wainscoating. Bathroom Styles
Return back to Wainscoting page.
Return From Waynes Coating page to Home - Finishcarpentryhelp.com.